Saturday 30 August 2014

Galaxy dress! No sew refashion.

I've had this blue linen dress in my wardrobe for a couple of years and it gets fairly regular wear through the summer as its light and airy and comfortable.


However a couple of weeks ago I came back from work and decided it was a good idea to start cleaning the bathroom while wearing it!  This was not my most intelligent moment!  This is what happened:

DUH!!!

As this dress was still in good condition and I really liked it, I was determined to rescue it in some way.  I blame this refashion on a discussion about the Northern Lights with a couple of friends and a really bling-y episode of 'Don't tell the Bride' (trash TV viewing reveal!)  Galaxy dress refashion:

What did I do?
Since the dress had bleached so easily by accident I simply splattered it with ordinary household bleach, hung it up and waited for the bleach to do its thing and the colour disappeared and then bunged it in a bath full of water to get rid of the bleach.

In the interests of full disclosure I should say that the moment I choose to do the bleach spattering was about 5mins before my friend Grace came round for dinner. Just FYI if you ever get invited to mine for dinner it may involve helping out with a refashion/sewing/photography!

I think it looked pretty epic once it had been bleached and dried out. However, never satisfied with a simple life, I still had other plans for this dress. 

I wanted to try out some iron on diamantes which I had bought from here

My 'technique' with these was essentially; throw them at the dress and see where they land and then iron them on. Except for a few strategic places where I knew I wanted a bit of bling detail.


The diamantes cost me £1.49 plus £1.15 for delivery and the bleach I had in the house and since the process was started by accident I'm not going to count it as a cost but even if you included another pound for the bleach, this refashion cost me less than 4 quid.  Totally worth it to rescue my dress and give me a new sparkly, star spangled one.  However when I asked my boyfriend for his thoughts, he said "nice but I'm never really going to be a fan of sparkly bits on clothes", what?  Good job I'm not taking his refashioning advice!

 I love it!!!

 Just look at the space pattern, this makes me happy.

Although you'd never know it from the look on my face.  I'm not sure why I always look so grumpy in my blog selfies.

And some close ups to get a better view of the bling! 

You can just about see the flash glinting off the diamantes.   


Tips for bleaching dying clothes based on my limited experience:
Make sure your fabric is made of natural fibres, this will not work on synthetics. My dress was linen so the bleach worked like a dream but the thread used in the dress was clearly synthetic. Look:

Do it somewhere animal and child free. I have a lot of cats and foxes in my garden that I would really like to leave, however, bleach poisoning is not the way to do it. Despite my casual splattering approach, I did clear up afterwards, this stuff is really toxic so be careful. 

Do it somewhere that is other fabric free! This refashion was motivated by an accident with bleach but I doubt most people (me included, despite my love for this dress) want 'bleach spattered' as a look for their whole house. 

Go easy with the bleach, it takes a very little amount to remove the colour. In areas where I was more liberal with it, it took longer to work and meant that I had to leave the whole dress with the bleach on for longer. Bleach can damage the fibres of your dress so you want it on for as short a time as possible.


Notes on the diamantes:
There were 144 in the packet and I thought this would be LOADS but it really wasn't, the diamantes are much more sparse on the back of the dress than on the front as I started to run out.

The instructions said to press on diamantes with the iron on a low heat and covering them with a cloth, however, I found that they didn't attach at all when I used a press cloth so I dispensed with it and just left the iron directly on the diamantes/dress for 20ish seconds.  I could do this as my dress was made from natural fibres but its something to consider if you want to apply them to a synthetic.

After one wear some of the diamantes have started to shed, this is before it's even gone through a wash so I'm not sure how long the sparkly element to this dress will last.

So with a little bit of bling, I'm off on holiday for two weeks!  See you all in a fortnight for 'one week, one pattern'.

Sunday 24 August 2014

Refashioned holiday shorts

I don't remember where these trousers came from, or how they ended up in my refashion pile but I have some dim recollection that they were at one point part of a hideous 2 piece outfit that my mum donated to me.  As my recollection is so dim, when I say donated, I hope that's what actually happened rather than she just forgot them here at some point and they got sucked into the black hole that is my sewing space.  Either way she's not getting them back now.


Don't they look truly hideous on me?  If their purpose was to make my hips and backside look enormous and strangely flat/shapeless at the same time, they manage really well.  


They were even missing a button!  However there was potential there.  The waist fits really well and they aren't too tight on the thighs or hips (probably because there is so much extra shapeless fabric there).  This is unusual for me as I have a small waist in comparison to my hips, part of the reason why I almost never wear trousers.  I also liked the rust colour which I find strange as I'm not usually a fan of orange tones but this one seemed like it had potential to go with quite a lot of things in my wardrobe.  Also it is a linen, viscose, acetate blend which feels really floaty and lovely and screamed holiday wear to me. 

So, I hacked off a lot of leg!  


The weather has become unseasonably cold in London and so there was no way I was going to model these outside.  To be honest wearing them in the house was a bit of a struggle for someone who feels the cold as much as me.  You're all just going to have to imagine the sunshine and beautiful beach that I would like to be photographing this on.  It's not that hard, right?  I do have a palm tree!

As well as chopping off a lot of the leg, I added some details which I think make these shorts a little bit more special.  I created turn-ups and top stitched in a green thread.  I made some tabs and added a green star button from my stash.

Luckily the trousers had a spare button attached to the label so I was able to repair the waist closure without having to root around in the stash for ones that fitted the buttonholes.  I added some more green top stitching round the waist. 

I'm really pleased with my new shorts and I think they'll go really well with the tops I've got in my wardrobe.  Luckily I'm not going to have to imagine wearing them on the beach, as this time next week I'll be there-yay!!!  Finished just in time to go in the case!

Tuesday 19 August 2014

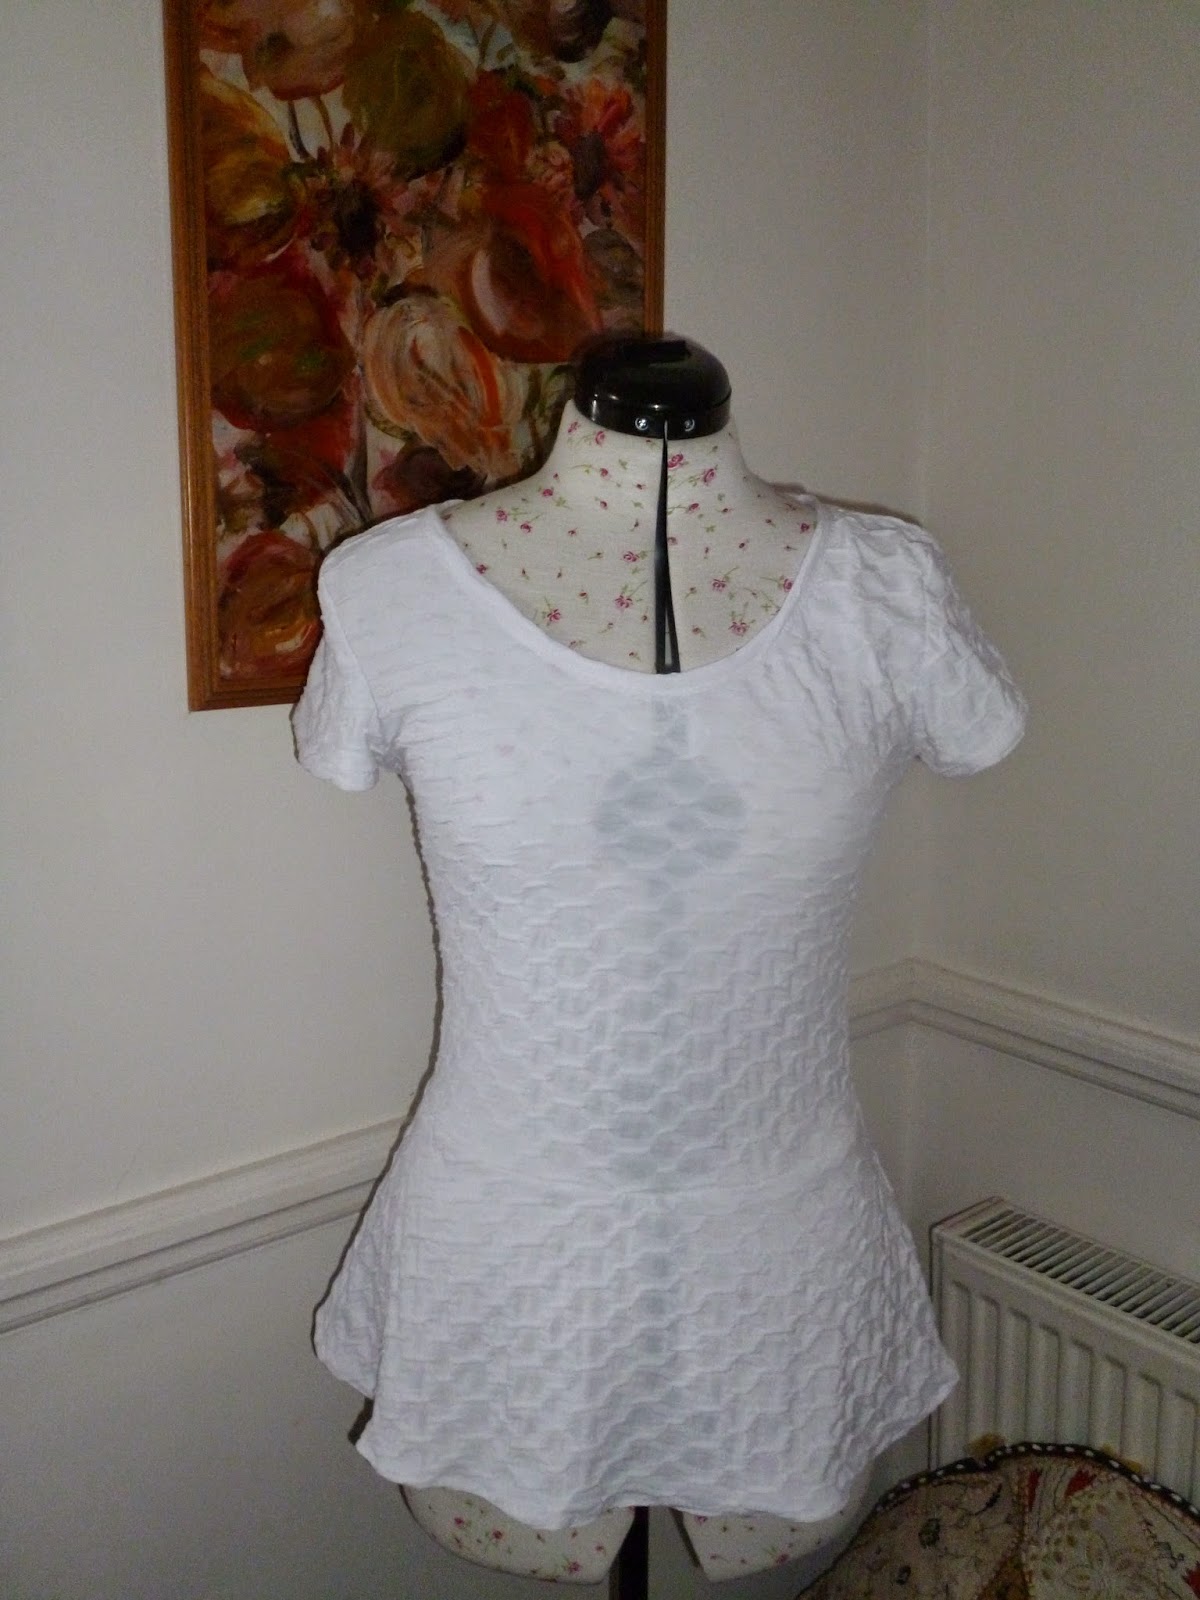
Lady skater peplum top

So I have already spoken about my love for my lady skater pattern, it was definitely my best pattern purchase ever and at the risk of boring you I have another version to show you.  This one however is a hack so hopefully holds some interest.


The hem is not as uneven as this photo makes it look, I just didn't arrange myself well enough for this photo.


It's been a while since I adjusted the pattern pieces for this but I think I just measured the 9" or so that Amanda recommends on her blog post and cut.  I made no alterations to the waist length or anything which was a bit of a gamble as usually I find peplums look really awful when the waist is too high but I guess since the bodice hits my waist at exactly the right place, the top has worked out ok.


A little bit about the fabric because making a plain white top is unlike me, although this is definitely a much needed item in my wardrobe.  I spotted this textured jersey in the offcut bin at Simply fabrics in Brixton.  Honestly, one day that shop is going to stop getting all my spare cash!  The raised chain like design woven through the fabric made it catch my eye and I knew I had to have it.  Hopefully you can see the cool texture in the above photos.  This is part of my drive to make some more solid staples, I need to focus on finding solid fabrics with interesting details so that they will fit into my wardrobe or convince myself that I can make patterns with clever details in a solid colour and the world will not fall apart!


I'm proud of myself and my first step towards neutrality, however those among you who need a bit of pattern in their lives, don't worry about me, I have several makes in the pipeline which have a lot of pattern going on!


Thursday 14 August 2014

Anna goes to Brighton

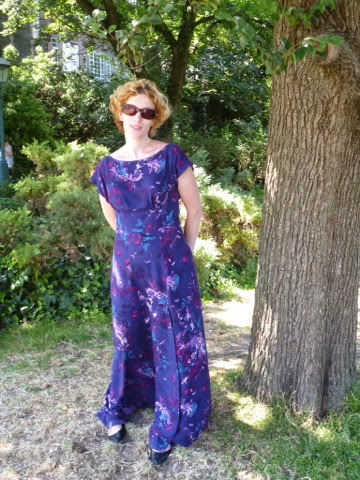
So my post title, which sounds like a Topsy and Tim book is actually my way of introducing my new Anna dress!  This amazing pattern from the By Hand London girls has been well documented all over the blogging world (apparently it's their most popular pattern) and I really have nothing new to add, just my version and love for this pattern.

I made version 1 out of a gorgeous navy, blue, purple and pink viscose fabric that I had picked up for super cheap in Simply Fabrics in Brixton.

Really not sure what I'm doing with my legs and feet in this photo, John Wayne in a dress style going on!!!


This dress was so easy to make up and relatively quick, even given the looooong lines of stitching for the maxi skirt.  I made this straight out of the pack with no alterations and it's pretty good for fit but when I make this again I will probably take a chunk out of the back as it gapes a little bit.  Sonja of ginger makes did a post about this which I will follow next time.  However, even with a little gapping, this dress is still wonderful and I'm completely smitten.  It's so nice to have an outfit that I've made that I like love, there have been a fair few duds recently, which have been incredibly frustrating and it's so nice to have put together something that should have been simple, and was, and that I should love and totally do!  Yay!  I love a maxi dress, it's an easy way to feel super elegant with limited effort. Also when the fabric is as soft and gorgeous as this viscose, it's perfect for summer as it kind of feels like I'm wrapped in a airy cloud!

The only problem with my wonderful but super cheap fabric is that it did not like going through my machine one little bit and I would get little lines of white thread running outward a from seams, not a look I was going for! Maybe I should have used a thinner needle, anyway, to minimise the weird white lines, I hemmed the dress and the thigh high split by hand! Lots of other bloggers have commented on how much nicer this looks but I'm lazy and had no intention of doing this could I have avoided it, however, accidentally my dress is not finished super neatly and invisibly!

This dress is my entry for the summer sundress sew along so it seemed appropriate to take it for a trip to the beach!


This boat was super cool and I thought an appropriate place to take beach photos but check out those seagulls behind, aren't they massive?  They attacked my friend's lunch (we were attempting to eat fish and chips on the beach), however she knows how to protect her lunch and with one swing of her handbag she reclaimed it from those crazy, greedy seagulls!

Having worn this all day to wander around in while wearing flat shoes, I realised I need to hack a few cm off the bottom of this.  Although it might be the perfect length while wearing heels, when I'm wearing flats the skirt collects all the dirt from the ground and rubs it over my legs (lovely, I know) and they end up FILTHY!  I really wish I'd taken a picture of them but sadly you'll have to use your imagination. 

Friday 8 August 2014

Scarf tutorial

So a lot of my sewing has been for others recently and I thought I would share a tutorial for my latest gift. This is a super easy and quick make but shows a bit more thought than simply going to h&m for something similar.

Sadly my photos for the first few (very simple) steps have disappeared into the ether!
My fabric was 150 wide and I cut a section 33(ish)cm section, using the width as the length of my scarf.  I just judged how wide I wanted it to be by eye and then leveled up the line with one on my cutting board for one nice swift cut with the rotary cutter. 

So now we're closer to having a scarf. You could of course cut this piece wider or narrower depending on your preference. Just remember to cut it a bit bigger (about 3cm) than you want your finished scarf to be as we will lose some fabric when hemming. 

Really this post should be named the 'hemming a scarf tutorial' as you could have worked out the first steps all by yourself. However the next steps are trickier. This tutorial is for hemming a scarf without a rolled hem foot. My machine doesn't have one, my mum's one which I have on semi permanent loan does, but it seems like a real faff to work out so I'm sticking with my method for the time.

First off, sew a line about 1cm from the edge all the way round the scarf.  This will give you a guide for the other stitching lines and will make the folding and pressing in the next steps, much easier.

Press the fabric in using your stitched line as a folding line.  The pressed fabric should have wrong sides together (mine has no obvious wrong side so this is irrelevant but if you're using a different kind of fabric you'll need to pay attention to this).


Stitch all the way round the scarf, as close to the folded edge as possible, preferably within a few mm.


Then trim as close to the newly stitched line as possible.


Fold the raw edge over, press, pin and then sew.  Take particular care when pinning and then sewing the corners.  I did not mitre the corners and just folded and stitched and they look good (at least I think so) probably because the hem is so tiny, however just be aware that there is an extra bulk of fabric at the corners which can cause them to flick out and ruin your neat edge.


And voila!  One finished scarf.  This probably takes about an hour and a half from start to finish (depending on the behaviour of your fabric).

*Warning* when switching between projects, where one is a synthetic chiffon scarf and the other is a cotton, ensure that the temperature of your iron has been adjusted for the synthetic!  I should have got three scarves out of my metre of fabric and I actually have two and a piece of fabric with some unattractive burn holes!  


Wednesday 6 August 2014

FO: McCalls M6604

So anyone who follows this blog regularly will recognise the fabric for this top from my Flora dress.  I loved the weight and pattern of this fabric and had about a metre left over after making my dress so decided to turn it into a top.

I used McCalls M6604 which had been a Christmas gift.  It looked like a really cute pattern which I could use to make some  simple woven tops and view C only took a metre of fabric (I had stashbuster bells going off in my head).  It is a simple t-shirt with some pleat detail across the bust which I thought would be cute and take it out of the realms of just a boring t-shirt and that hopefully could later be made up in some plain fabrics.

This version was supposed to be a little short sleeved t-shirt but somehow in the sewing process my sleeve pieces disappeared (does this happen to anyone else or is it just me sewing in chaos?) So I used some bias binding to hem the arm holes, which actually makes it better for the current heat wave we're having in London.


Looking at these photos, you might think this top is fulfilling its brief.  However I had several issues during the construction of this top.  The neckband piece is clearly too long for the neck and for it to lay flat.  Having attempted to sew it together twice and had issues both times, I hacked about 1.5cm (maybe 2) off the length and then tried again and suddenly had a functioning neckline.  I'm not going to lie, there is still some waviness and excess going on in the neckline but I think only I notice this and NO WAY was I about to attempt this a third time!

However having worn this a few times it really is not doing what I want it to.  It feels awkward, too tight across the bust (although there is excess fabric there) and generally is just making me a bit cross.  Part of this feeling is over the time it took to get something wearable when this should have been a really simple make and the rest is annoyance that this top is not fulfilling its brief and to make it worse I already cut and started making a second version before realising these things about it!  I will probably go on wearing this version as I'm so in love with the fabric and feel I can just about carry it off.  The second version has been relegated to the scrap/refashion pile already which is frustrating as it was not a cheap fabric.

However I'm still in the market for a good woven top pattern.  I'm currently eyeing up Sewaholic's Belcarra blouse and grainline's scout tee.  Anyone have any advice on these or recommendations for other good patterns?