Monday 27 April 2015

Lady skater hacks

So I have spoken about my love for Kitschy Coo's lady skater pattern before, I have made a number of versions and hacks and it was my 'One week, one pattern' pattern last year. I feel it is one of those patterns that can be hacked and used in so many ways and I'm clearly not alone in this thought as I have seen so many great hacked versions of this in the blogosphere.  Inspired by Making it well's list of Renfrew hacks, I thought I'd compile a similar one for lady skater hacks.

*Probably good to note at this point that I am not affiliated in any way to Kitschy Coo and am not being compensated for this post.  This is entirely self-driven gushing! 

These are not all tutorial posts but are included as inspiration.  All photos are reproduced with permission.

Neckline hacks
This zip detail neckline hack makes me drool https://frooandboo.wordpress.com/?s=ladyskater

Sleeve hacks
Amanda from Kitschy coo has a great tutorial on her blog for making the pattern sleeveless http://kitschycoo.blogspot.co.uk/2013/09/lady-skater-pattern-hack-sleeveless-tutorial.html?m=1


Maxi hacks
In her initial review of this pattern, Delia from Delia creates had created 3 versions of the lady skater, including a maxi version which inspired me to make this summer dress (also using the sleeveless tutorial)

Wrap dress
Sabra at sew a straight line created a tutorial for modifiying the lady skater to a wrap dress http://www.sewastraightline.com/2013/10/lady-skater-all-wrapped-up.html?m=1
wrapped lady skater sew a straight line-4-2
This has been on my 'to make' list since Sabra first created it, I really must get on that.

Skirt hacks
I desperately want this 'Peggy dress' created by Ping
Peggy dress
Happily she posted this comprehensive tutorial: http://peneloping.com/2014/04/04/tutorial-lady-peggy

Janelle from Sew Hopeful also used this pattern as her one week, one pattern, pattern and used it to make a couple of skirts.  I can't believe I haven't done this yet!

Top hacks
Again Amanda from Kitschy Coo has done a great tutorial for a peplum hack  http://kitschycoo.blogspot.co.uk/2013/06/choose-your-own-adventure-peplum-edition.html?m=1
I used it to create this peplum top, it was really easy to follow:

I've just spotted that Charlie of This blog is not for you has also just created a peplum top but with a super cute key hole detail.  Check it out here.  

Also the sleeveless tutorial on the Kitschy Coo blog doubles as a tutorial to create a tank top.  I'm going to use the remnants from my boat neck lady skater to create one of these.

I've also used the bodice as the base for a couple of tops which never made it to the blog although you can see one in my 'One week, one pattern' post.

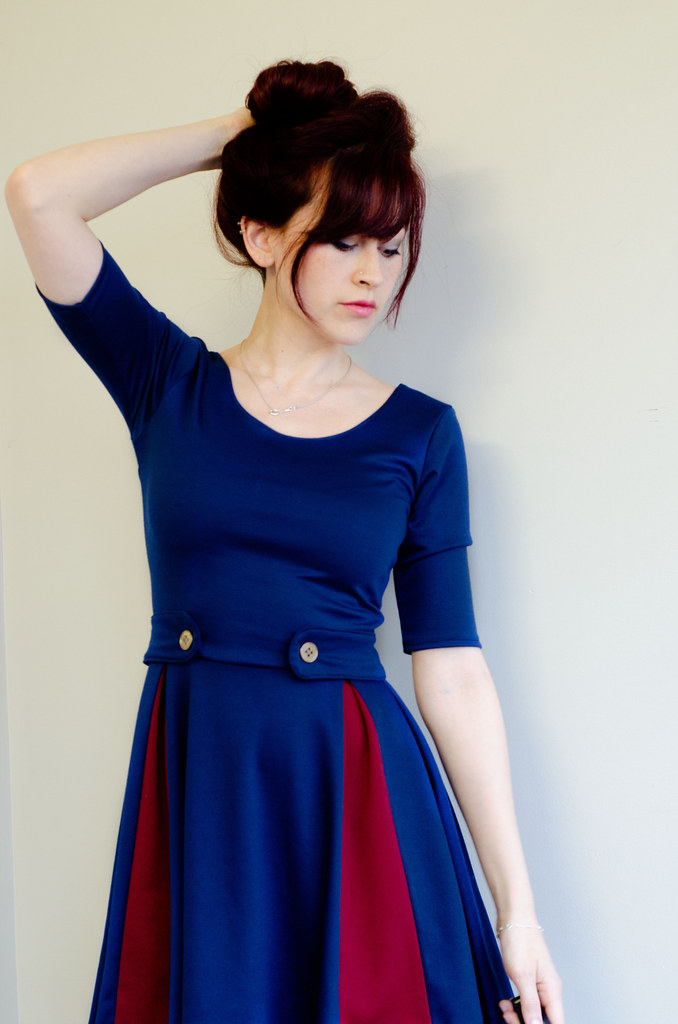
Playing with details
Charlie from This blog is not for you has done a couple of great hacks.  This one has a tutorial for creating puffed sleeves but also creating contrasting side panels.
Lady Skater dress by thisblogisnotforyou.com

Vintage Lady Skater Dress by Thisblogisnotforyou.com
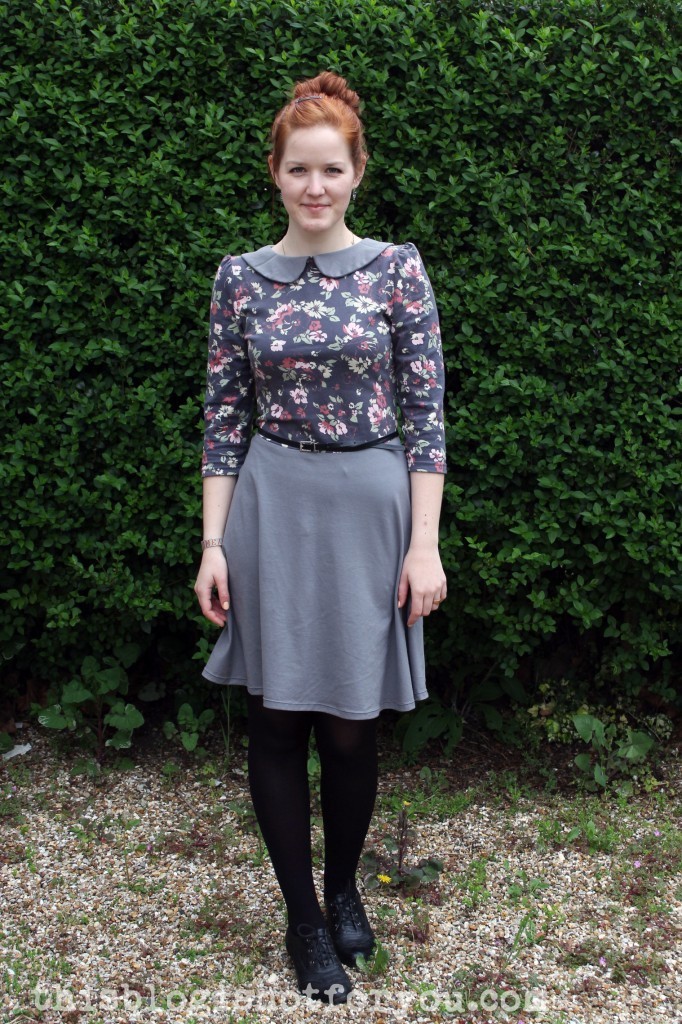
This one includes the puffed sleeves and has a super cute Peter Pan collar.

Pattern mash up hacks
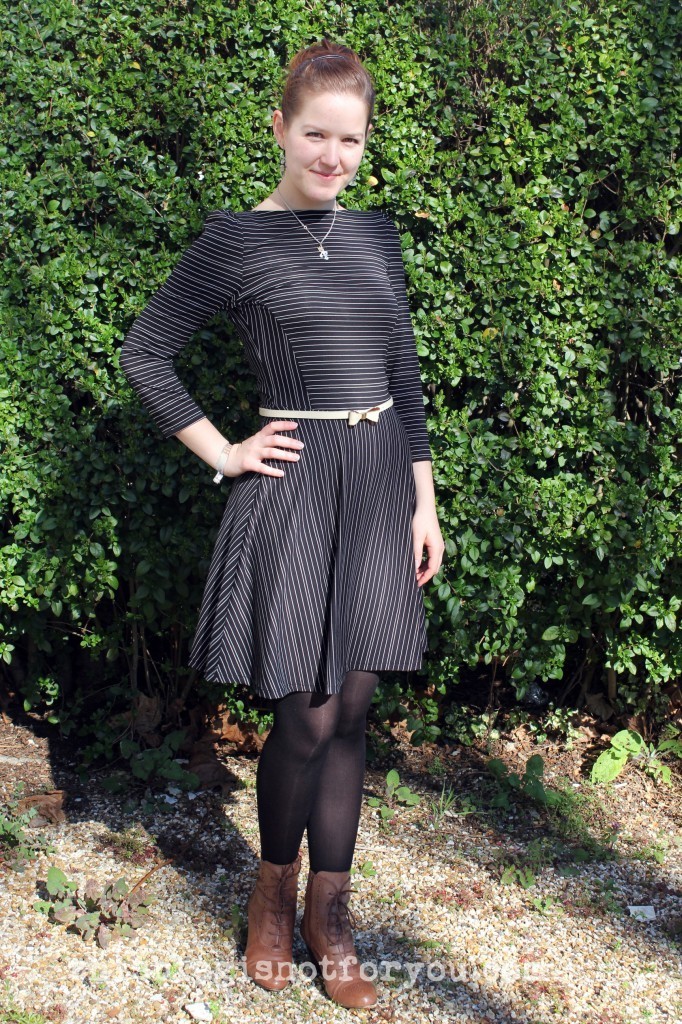
Sarah posted her Renfrew/lady skater mash up on the Katy and Laney blog:
I want one of these in my life-maybe for next autumn.

Maternity/nursing hacks
Lauren from Baste and Gather created this nursing version http://basteandgather.com/lady-skater-dress-hacked-for-nursing/ I'm not familiar with the standard design of nursing tops but basically Lauren seems to have created a second layer under the bodice  so that the top bit can be pulled up for easy access (spot the clueless non-mum in this description).  Hopeful her post will be clearer to you than my ramblings.  I just love the fabric she used!
Lady Skater Dress by Kitschy Coo - Hacked for Nursing

I want all the lady skaters....  Let me know if you spot any that I've missed.  Which ones do you fancy making?

Sunday 19 April 2015

Boat necked lady skater-tutorial

Hi everyone, happy Sunday! I hope you're all having a good day.  I am suffering a little following a night out with a friend last night and am so not in the mood to do the work on my doctoral proposal that today was set aside for.  Instead I'm bringing you another lady skater!

Making my Bronte top reminded me that it had been a while since I had used my much loved lady skater pattern and on my recent trip to Birmingham, I picked up a lovely stripey jersey that was screaming out to be made up right now!  However my stripey jersey was whispering to me that it should be made into a boat neck-enter another hack!

 This was a really easy hack to achieve.  I traced off the front and back pieces.  On the front piece I measure and marked 15cm up from the middle of the neckline.  I then measured and marked 4cm across the shoulder.  I then used my french curve to join these two points (however, I've done this kind of thing just eyeballing the line between the two points so you don't need to worry if you don't have a french curve).

The only thing I did to the back piece was to measure 4cm across the shoulder piece and create a line from there to the centre back to create a new neckline.  
I then made up the dress as I normally would.  

The skirt is a little longer than I would like but it isn't actually hemmed yet.  I wanted to take advantage of the sun and a day out to photograph it and as jersey doesn't fray, I just went with it.

 The stripe matching worked pretty well but I discovered the stripes are not on grain which has made  for a strange optical illusion around the waist seam (hence the belt).

 The boat neck has turned out really well but on me it has a slight cowl effect as I appear to have a hollow chest (learning more about fitting has some knock on effects on the way you view your body!)  Next time if I want a boat neck that lies flatter against the collar bone I will angle the central neckline extension (the one in red) a bit more towards the shoulder seam. 

 Although spring is pretending that it has arrived in the UK, the wind when I was taking these pictures was fierce and I was so cold.  I was very happy to put my other layers back on to take some more silly photos with my sister. 

 Thanks for the photo skills Leonie!


We were out taking advantage of the sunshine by having a walk along the south bank and got a few good photos of London monuments:
 Tower of London

Tower Bridge

Overall I'm really pleased with my new stripey dress.  Anyone else in the market for a boat necked dress?  I think I have just enough scraps left over from this to make a stripey vest top which should be super useful for summer.

Thursday 16 April 2015

Things you wish you'd never started...and a vintage skirt!

Hello all.  Just as spring hits the UK I have a post about a winter garment to show you.  However, as our weather is a fickle thing, it could be snowing tomorrow, I'm going for it any way.  

My tartan mini-dress is possibly the garment I have spent the most time fixing in the couple of years that I have been sewing.  As there were so many fitting issues the careful pattern matching that I had planned was completely ruined on the sides of the dress (although it did work down the back)!  However, to show you the pattern matching perfection I was going for, I have the star of this blog post, my vintage tartan skirt!

I've been meaning to do a blog post on this skirt for ages because it is just such a beautiful garment. This was yet another item inherited from my stylish Granny.  As I only ever knew my Granny when she was really old, I didn't know much about her stylish fashion conscious days but at her funeral there were stories about how great she had always looked and how much she had loved clothes.  When I got a chance to see some of the old pieces that were still in the house, I totally got where everyone was coming from.  
Look at the expert pattern matching going on on this skirt, swoon!  It is all immaculate!  

I've been wearing this skirt in pretty heavy rotation this winter and I love it, although to tell the truth, stylish granny was thinner than me so on days when I've been eating winter comfort food, I end up opening the top buttons.  Although it still fits me better than it fits Rosie, I'm not sure why it's sitting quite so awkwardly in these photos and steadfastly refusing to close.

  
A quick look of the Vintage fashion guild site makes me think that this skirt is from the 1940s.  The label on the inside says Harella, and the Vintage fashion guild site told me that they were an English clothing company set up in 1919 and by the 1960s was the second biggest exporter in the UK fashion industry.  I would really love to know where my Granny bought this skirt as I know it was not in England and I guess the number of stockists in Belfast/Dublin would have been small.  

I expect this skirt cost a pretty penny however, this clearly bought you serious quality back in the day. Look at the hand finishing on what (I'm assuming) was an off the peg skirt! 


Also it was clearly important to take care of your clothes and the 'make do and mend' spirit was still in full swing.  There are a couple of these darned patches on the skirt but I must have worn it at least 10 times before I noticed them-someone was doing some neat work there.


I also have a matching scarf but I haven't yet worn them together as the matching set is a bit too Vintage for me, I usually mix and match decades rather than recreating a particular period's look.
.
Any of you have a favourite Vintage item in your wardrobes?  Do you know the stories behind them?  I have a few more classic items like this in my wardrobe and am considering making it a regular feature on the blog, would you be interested in more posts like this?

Thursday 9 April 2015

Me Made May 2015 pledge


I took part in Me Made May (MMM) for the first time last year and really enjoyed it, you can see my round-up posts here, here, here and here.

What is it? 
Well for those who don't know, MMM is "is a challenge designed to encourage people who sew/knit/crochet/refashion/upcycle garments for themselves to actually wear and love them". It's hosted by the lovely Zoe of SoZo,whatdoyouknow and has been running for 5 years.  Throughout the month of May, lots of crafty people will be setting themselves a personal challenge to wear their me-made items more in order to understand what it is that works/doesn't for their life and wardrobe.  

My pledge
Last year I pledged to wear a me made item 3 times a week. I ended up surpassing this and as I've now been sewing/knitting/refashioning for a whole year longer, I've decided to up the ante. Therefore my pledge this year is to wear one me made (sewn, knitted or refashioned) item every day throughout May.  One of the great things about this challenge is it encourages you to step back from the panicked 'must sew new pattern' frenzy (I know I'm not the only one who does this) and look at your wardrobe gaps and think more about what it is you need.  I know I've been really bad at this recently and have trampled all over my sustainable clothing ethos and I have  a mending basket full of me made and ready to wear items that I resolutely ignore in favour of the new shiny project.  So therefore for MMM, I also pledge to mend/refashion at least one item every week in May, this should also give me more choice in my wardrobe!

I love seeing what everyone's pledges are and what they have been wearing during MMM. I'll be doing weekly round up posts here on the blog.  Have you signed up?  If not, you can do so here. I'm excited...

Wednesday 8 April 2015

A tartan mini dress: Simplicity 6652

Hello my lovelies. I hope you all had a lovely Easter weekend full of lots of chocolate and cake and fun times!  I spent the weekend in Solihull with my boyfriend's family which had the added bonus of a little trip to the Birmingham rag market and Barry's!  I have been declared a failed stash buster!  However, I was fairly restrained, I only bought 4 metres of jersey and 1 of quilting cotton.  

On my trip to York in January, my friend and I hit some charity shops and discovered a couple of vintage patterns which I snapped up. Actually one shop (sadly I can't remember which one) had an amazing vintage floor with some great vintage clothes and sewing and knitting patterns. Ironically none of the patterns in there took my fancy but in the Oxfam shop down the street I found 2, which made me happy.  The first was Simplicity 6652, a pattern from 1966. It was in really good condition (as it turns out, totally unused) and in my size, score! I'll probably chat more about the other at a later date.
I've wanted a tartan mini dress for ages and this pattern has so few pieces that it seemed like a good way to go.  I chose to make the sleeveless version, thinking that it would be a good piece to layer over a top when it's still chilly and by itself when spring arrives!

It's labelled 'simple to sew', as it turns out this is a misnomer! In some ways few patterns pieces means easy to sew however I had so many fitting issues that it was super complicated.  To start with I made some planned changes to the pattern: the front of the dress had two pattern pieces, I am not a fan of seam lines down the front of dresses or skirts and definitely not ones where I have to pattern match so I removed the seam allowance and cut the front piece (and facing) on the fold. 
Broad back adjustment, this is something I've recently worked out I need to do in quite a few patterns so you'll be seeing a fair few of them in these parts. I sewed the dress pieces together and inserted zip, so far so good, however when I tried it on, it looked like this:
You can't tell everything that was wrong from this photo but you can see it was miles too long. Although it fit well over the hips, it was huge on top and the shoulders extended too far.

I made the bust darts bigger, took a lot (I think like 25cm overall) off the sides, grading out to the hips.  Cut back the shoulders and increased arm hole size.  I also lowered the neck line, I don't consider myself to have an elephant neck but the original neckline was strangling me.  At one stage the dress looked like one of those pre-surgery plastic surgery patients with lines all over it to show where I needed to make alterations! I ended by finishing the neck and arm holes with bias binding, no way was I about to start drafting facings after all the alterations I'd made.

I now like the final result. There are loads of flaws as a result of all my hacking but the busy tartan print helps to hide them. It's worn here over my Bronte top.

I made quite a lot of effort to pattern match which all the alterations totally messed with, however it did work down the back. Look at those matching lines:

I now like the shape of this dress but will have to transfer all the changes to the pattern pieces before making another version and I currently do not even remotely have the motivation to do this so it may be a while before version 2 pops up.  However, this is my first make as part of my vintage pattern pledge, whoop for one down, just 3 more to go!

Thanks to my photographer and porter for these shots:
I was so happy to put all these clothes on again afterwards, it was COLD in Solihull this weekend!

Wednesday 1 April 2015

Bronte top

When Jennifer Lauren released the Bronte top pattern I loved the unusual 1940s shoulder detail. I also really like the name, I'm a big fan of the Bronte sisters so the name gives me a thrill. When Jennifer held a Black Friday sale, I decided to stop resisting and purchased it.  It's taken me 5 months to get round to sewing this up but I'm so glad that I have.


I sewed it up in a lovely soft grey jersey that I had in my stash. I have the impression that I bought this in Goldhawk Road when I was in my lady skater obsession phase (hmmm it's been a while since I made one of those). However I'm pleased it's become a Bronte top. Although having worn it a few times, I've realised it's clearly a polyester, it is not breathable :(

I made this with long sleeves and I'm a little sad that maybe as we move into spring I may not get so many opportunities to wear it. However, it's still not that warm so until we get actual warm weather, I'm going to go on wearing this top in fairly heavy rotation, in fact I actually had to pull it out of the wash basket to photograph it (don't worry it then promptly went in the washing machine).

Although this top is totally wearable and comfortable, I do notice quite a bit of fabric crinkling in the over-bust to underarm area.  Anyone have any tips about why this might be, and more importantly how I fix it?